Thursday, February 28, 2008

Month number 2...

I haven't really got a lot done this month due to to being busy with other things in my life such as working on the house and getting some new dogs. Its been just over a year since we lost our precious little dog Chloe who was 18 when she died in her sleep after a long illness. We still haven't got over the loss but the 2 new ones should help. We picked them both up from the RSPCA and the border collie cross, Ki-Ki, is approx 12 months old and the little fox terrier cross, Sooty, is 10 and a half years old. Ki-Ki was found wandering the streets and Sooty was surrendered by her owners as they were moving into an apartment that didn't allow dogs. How you can hand in your pet after 10 and a half years has got me beat but humans will be humans.


Anyway onto the Searey. I have spent a lot of time on the electric landing gear this month trying to modify it for a couple of different reasons. I mentioned last month that I wasn't happy with the amount of over centre with the gear fully extended. (see photo below)

Click photo to enlarge

Even though the electric actuators would hold the legs from collapsing in the event of a bumpy landing etc, its really not the correct way to engineer it. I am also not happy with the possibility that the retraction bar would be pushed into the lower bulkhead if a microswitch failed when the gear is retracted possibly warping or breaking something... not a nice thing to happen in flight! See photo below to get a better idea of what I mean...

>
Click photo to enlarge

After both sides were assembled and operational I called another local Searey builder, Paul Williams, to have a look at it and get his opinion. Paul has a lot of engineering experience having invented and patented a unique drying furnace among other things and of course building his own Searey. He suggested we check out how much travel the actuators have in each direction so we can establish if we can move the bracket on the retraction bar to get not only more over centre, but at max extension to make sure it will hit the internal limit clutch before deforming the bulkhead or breaking something else. After a preliminary measure up we now believe this is achievable.

In March I will be making new stainless steel brackets that attach to the retraction bars to see if I can achieve the above result. Unfortunately these modifications hold up the building of the rest of the Searey but it is well worth it to get such an important part of the aircraft as good as possible. There has been many cases of Searey undercarriages failing on either landing or taxiing so I am determined to make sure mine is not one of them.

Will update this blog when the gear is modified to my satisfaction.

Wednesday, January 23, 2008

The first month...

Well it's been just over a month since my Searey has arrived and I am quite pleased with the progress. It is actually starting to look like an aeroplane and I am getting used to how everything works. If you are interested in more information and to see what a completed Searey looks like, go to the manufacturers website at http://www.searey.com/

The first thing that goes together is the main bulkhead which is the integral part of the fuselage that everything else bolts onto.


The next bit is assemble the forward cockpit including rudder pedals....


..... and attach it to the bulkhead.....


The root support (where the engine will eventually be bolted onto) is then fitted.....


Next is the boom that makes up the rear section of the fuselage.....


See I told you it is starting to look like an aeroplane!


Next I flushed out the fuel tank to remove rubbish as a result of the manufacturing process and painted it with aviation grade etch primer.


then upholstered the console.......


fitted a heavier duty forward fuel tank support angle......


and made and fitted a bracket for the inline fuel filter. Because the fuel tank is an Australian modification, it means that I have to manufacture some parts as they are not included in the US kit.


Next step was to fit an electric fuel pump. Even though the engine I have chosen, a Rotax 912S, has an engine driven fuel pump, I have fitted a back up electric type for take off, landings and in case of the engine driven one failing.... always nice to have back up systems! I made up some brackets and fitted it to the lower bulkhead making sure to fit some his density foam between the pump and the mounting point to stop vibration.


I was going to fit the fuel tank now however I thought that it would make it more difficult to fit the electric undercarriage system with it in situ so I have decided to fit the gear first. The electric gear that I will be fitting is the third generation for the Searey. The first Seareys had a manual system, then they went to an electric/hydraulic and now the electric type. Because it is quite a new system the manufacturers, Progresssive Aerodyne in Florida US, haven't got around to updating the assembly manual so I am relying on photos from Rob Loneragan (Australian Distributor and now building his 4th Searey) and his verbal advice. I have found it OK however I have to guess what bolts to use and some don't seem quite long enough as all bolts use nyloc nuts and ideally there are supposed to be a couple of threads showing when tight and some don't so I may have to buy longer bolts for some parts. Because I live 150kmh from a major centre that sells aviation grade bolts it holds production up sometimes and can be frustrating.


I have loosely assembled the gear to fully understand how the system works and to make sure I have all parts required.


I have some concerns regarding the "over centre" position as I believe there is not enough of it! There is quite a simple way to adjust it so I will fill you in on the results next month.

I know this looks all very quick and easy however it has taken me just over 31 hours to get to this stage.

See how we go next month.

Saturday, December 29, 2007

First things first....

My garage where I am going to build my Searey is 5.7m x 5.7m which should be plenty of room. The first thing I did was to paint the floor in an off white 2 pack paving paint to give me more light, make it easy to clean and so I can find small objects when I drop them. I then bought some knock together workbenches and a 2 door metal storage cabinet to store more sensitive parts of the kit like electrical components. I also fitted a vice and a bench grinder. I am fortunate to have plenty of hand and air tools left over from my old car importing business so don't have to buy much in that department. In fact I am probably a little over tooled (if there is such a thing) with regards to building a Searey as you really don't need much more than a drill, rivet gun, a few screwdrivers, some AF spanners and sockets, tin snips and a few other bits and pieces.

Anyway the workshop is just about ready and I have started to coat the inside of some of the fuselage parts with Linseed oil to help prevent corrosion. I have been advised to boil the Linseed oil even though it has already been manufacturer boiled to thicken it up to help it stick. My first attempt at that caused an environmental disaster.... I turned up the heat too much and it caught fire and burned up the whole litre! Reminded me of the oil fires in the first Gulf war! Anyway it worked OK on the second attempt.


To stop the oil pouring out various drill holes and the other end of the tube it's a good idea to plug them with some masking tape, preferrably the blue stuff that isn't hard to get off after a few days. Then I just poured a few mils into one end of a tube, swished it around and emptied the remainder into a bucket. I'll do this to every tubular part on the Searey.


Next item on the agenda is to start bolting the fuselage together! Should be interesting....

Wednesday, December 12, 2007

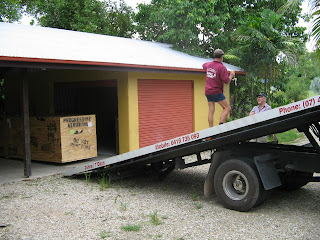
It's here!

My Searey has finally arrived all packed up nicely in its crate with no transport damage...


I will be building it in my garage (or more professionally my ACF - Aircraft Consruction Facility) over the next 12 months. Although the manufacturer estimates a 500 hour build time I expect to take much longer.


The first step is setting up the ACF by painting the floor, fit workbenches and storing the various parts away from insects and animals (I live on the beach near rainforest so have to watch out for various animals and salt air) then its onto corrosion proofing the various alloy tubes before assembly.


Almost ready to fly!